 The Trinket microcontroller from Adafruit Industries is a tiny and inexpensive (US$8 for a single unit) way to control your electronics projects. One of the coolest things about it is that you can do I²C (and communicate to lots of inexpensive sensors and displays using only two pins) and still have plenty of room left over for your code in the ~5.5KB of flash on board.
Read on to see an example of how to do I²C communication on the Trinket (or anything with an Atmel ATTiny85) while shaving every possible byte. Also included: driving the Adafruit Mini 8×8 LED Matrix with I2C Backpack.
Update: This article is part of a larger series on building an AVR-based compass. You may be interested in the other articles in the series.
Show Me the Code
Just want the code? Here you go: playanim.tar.gz (16KB) or playanim.zip (20KB)
Motivation
I wanted to put together the Trinket, the 8×8 LED matrix and an I²C sensor for a project I’m planning. A few minutes of searching led me to Phillip Burgess‘ Trinket / Gemma Space Invader Pendant. Someone else has already done the hard parts for me; yay!
It’s a great project, I learned a lot from studying it, and I’m very grateful to Mr. Burgess for sharing his creation. But as I worked with it, I realized that it wasn’t an ideal starting point for my own project. My specific objections were:
- The ATTiny85 only has 8KB of program space. With the bootloader on the Trinket, there’s only about 5.5KB left. Using the TinyWireM library consumed more program space than I was ready to give.
- While the Adafruit GFX and Adafruit LED Backpack libraries are way too big to fit on the ATTiny85, talking to the LED matrix driver at the “bare metal” wasn’t very attractive either. Some middle ground (in the form of a lightweight LED matrix library) would be nice.
- I wanted to use the GNU AVR toolchain from the command line, not the Adruino IDE.
- While I can code in C++, I’m not really fond of it, and it has overhead I don’t want for an embedded project with severely constrained memory. I’d much rather use C (and possibly inline assembly if I really need to).
Build Environment
I started by porting the Pendant code to build under the GNU tools. This was straightforward, save for a dumb mistake on my part. (In my Makefile, I left the -mmcu= option off of the link step. This produced a program that mostly worked, but displayed garbage because pgm_read_byte () was looking in the wrong place.)
I²C
Next, I started looking at how I wanted to do the I²C communications part.
Some background: I²C (also known as TWI — Two Wire Interface) is a data communication protocol originally developed by NXP back when they were Phillips, and since then implemented by just about everybody. The specifcation is free.
It’s interesting in the context of doing things with the ATTiny85 for a couple of reasons: First, you can talk to a whole bunch of peripherals using only two pins on the processor. (That’s two total, not two for each device.) Second, while the ATTiny85 doesn’t have native I2C hardware, it does have something Atmel calls USI (Universal Serial Interface) that makes doing I²C in software a lot easier. It doesn’t hurt that there are lots of I²C peripherals out there, many of which are cheap.
For doing I²C communication on the ATTiny85, the options that I found were:
- The Atmel USI_TWI_Master reference library from their Application Note AVR310.
- The TinyWireM library (originally posted on Adruino Playground by BroHogan, and subsequently tweaked by Adafruit). This is a modified version of the Atmel reference library with a C++ class wrapper around it.
- Peter Fleury‘s I²C Master Interface library. This is a bit-banging pure software I²C implementation hand-coded in assembly language.
- Rolling my own implementation either completely from scratch or built on top of one of the other options.
I wanted to get away from C++, so I preferred not to use TinyWireM. I also didn’t like the idea of having the transfer buffer (with a hardcoded size) be part of the library.
Mr. Fleury’s library was technically impressive, but I was using a chip with USI and had no need for a pure-software implementation.
My initial plan was to build a C library on top of the Atmel reference library. After looking at it a bit, I realized that was overhead I didn’t need. I ended up using a slightly modified version of the reference library plus an extra header file with some simple preprocessor macros.
The modifications I made to the reference library were:
- By default, the library used 400KHz I²C. I changed it to 100KHz.
- The library assumed a processor clock speed of 4MHz. I changed it to use the value from the preprocessor symbol F_CPU (provided on the compiler command line in my build environment).
This worked well, saved space, and it was easy to modify the Pendant code to use my I²C library instead of TinyWireM.
8×8 LED Matrix
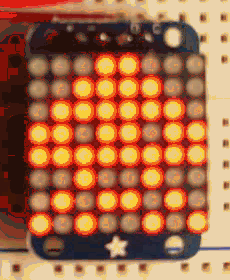
The Adafruit Mini 8×8 LED Matrix with I2C Backpack is driven by the Holtek HT16K33 RAM Mapping 16*8 LED Controller Driver with Keyscan (see data sheet).
Adafruit provides some very capable libraries for driving this matrix: the Adafruit LED Backpack library which is built on top of the Adafruit GFX library. These do lots of great stuff (like drawing text and lines and circles). But, they’re meant for processors with way more program memory than the ATTiny85, and they’re C++ only.
So, I wrote my own matrix driver library (on top of my I²C library). It’s pure C and very stripped-down. It lacks most of the features of the Adafruit library, but there are #defines for all of the driver chip commands, and it can draw bitmap images (from program memory) on the matrix like a champ.
Modifying the Pendant code to use it was easy and it worked as expected. Oddly enough, adding this library saved considerable space, as I was able to get rid of the 256-byte lookup table in the original Pendant code.
Optimizing for Space
I made some other modifications (both to the Pendant code and my build environment) that helped save space. These include:
- In the original Pendant code, when an animation frame was repeated (which happened a lot!) the bitmap was stored once for each appearance. I added a simple list of steps, so each bitmap could be stored once then referenced as often as desired.
- Instead of an ISR() with an empty body (to awaken from sleep on a pin-change interrupt), I used the EMPTY_INTERRUPT() macro. This saves 18 bytes.
- Functions with no automatic variables save some call and return overhead. Preprocessor macros are better still.
- In general and with some exceptions, newer versions of the GNU AVR toolchain result in smaller binaries than older versions. As a concrete example, when I build on Ubuntu 12.04.4LTS,I get an 840-byte binary. On Ubuntu 13.10, building the same program gives me a 795-byte binary. (Both systems were tested on the same day, and had all current updates installed.)
- When compiling, I use the -ffunction-sections -fdata-sections options, and when linking I use -Wl,–gc-sections. Together, these allow the linker to completely remove unreferenced chunks of code (such as library functions that are never called).
- Compile with -Os (which I assume but don’t know the Arduino stuff does already).
Important note: –gc-sections works great in the embedded world, but breaks things in the desktop world when you statically link things with “magic” sections. See Denys Vlasenko’s presentation on the topic for details.
Using these techniques together with things I mentioned earlier (using a thinner I²C library and eliminating the matrix driver lookup table), I was able to get the Pendant binary from over 1600 bytes down to 795 while keeping it functionally identical.
That’s exciting, because it means I have a compact and known-working starting point for more complicated projects involving the Trinket and I2c peripherals.
Tips for Trinket + Ubuntu
The biggest hurdle I faced in getting my build environment set up was that avrdude didn’t want to talk to the USB port without root permission. (This problem is common to any libusb-based solution.)
The solution is to create some udev rules to make sure that the devices files end up with the right group and permission. This is more tricky than it ought to be, in part because the syntax has changed several times in the last few years, and in part because Ubuntu puts the rules files somewhere unexpected.
Here is my recipe, tested on Ubuntu 13.10 (with all updates as of 15 Feb 2014):
SUBSYSTEM=="usb", ATTRS{idVendor}=="1781", ATTRS{idProduct}=="0c9f", MODE="0660", GROUP="plugdev"
SUBSYSTEM=="usb", ATTRS{idVendor}=="16c0", ATTRS{idProduct}=="05df", MODE="0660", GROUP="plugdev"
SUBSYSTEM=="usb", ATTRS{idVendor}=="16c0", ATTRS{idProduct}=="05dc", MODE="0660", GROUP="plugdev"
(In case your browser formatted things differently, that should be three lines, each starting with SUBSYSTEM.) Place the text above in a file called /lib/udev/rules.d/10-usbtinyisp.rules. Yes, there is a /etc/udev/rules.d/ with some files in it that look purposeful, but — like the goggles — they do nothing.
Once you have created the file, restart udev (as root, run the command: restart udev). Unplug and re-plug your device. You should now be able to run avrdude as a normal mortal user that is a member of group plugdev (which you should be by default — run id -a to check). Remember that if you have to add yourself to a group, the change will not take effect until you log out and back in.
If you get an error like:
avrdude: error: usbtiny_transmit: error sending control message: Broken pipe
avrdude: initialization failed, rc=-1
then you ran avrdude either too early or too late relative to when you pressed the reset toggle on the Trinket. Wait until you see the red LED slowly pulsing at around 2Hz. You have a window of about 10 seconds.
If you see stuff like “6 retries during SPI command” that is normal and OK. It’ll still work fine. I don’t ever not get that.
The Trinket seems picky about USB ports. As mentioned in the documentation, it doesn’t like USB 3 ports. It also seems iffy about the USB 2 ports on my ancient laptop. A solution to both of these problems is a cheap USB hub. I’ve never gotten it to work with the USB virtualization on VirtualBox, but then half of the real USB devices I’ve tried don’t work with that either.
thanks for the informative post. like you, i wanted to do things via command line (avr-gcc vs arduino). is there a book you can recommend about avr coding? i’ve done a lot of c++ stuff before and a fair about of c, but no avr programming before. i did take a look at your example code and was able to get it compiled on my linux box so it’s a starting point for me. any help would be greatly appreciated. (i too am working with a trinket from adafruit)
The only actual book on the topic in my library is Getting Started with Arduino from Maker Shed, but as the title implies it assumes you’re working within the Arduino ecosystem rather than “at the bare metal”.
Most of the resources I’ve used are online. The “AVR Programming” series on Hack-a-Day is a good place to get started.
The O’Reilly AVR Programming book looks interesting, but I haven’t used it. (Update: It looks interesting enough that I just ordered a copy.)
Also, once you have a specific project in mind, it’s often fruitful to Google “AVR Goat Milker” or whatever and see if somebody else has some example code on-line. In some cases (like the I2C stuff), Atmel actually has reference code you can plunder.
Data sheets are ultimately required reading, but they’re a little intimidating from a “getting started” perspective, especially for something like a microcontroller where they run to hundreds of pages and assume quite a bit of general knowledge.
Happy Hacking!
Update: The O’Reilly AVR Programming book is excellent, and I heartily recommend it. This ain’t, as they say, my first rodeo, but I learned a lot. Well worth the price of admission.
Full disclosure: No relationship, financial or otherwise, with author or publisher; uncompensated and unsolicited personal opinion.
thanks for this line about the Trinket “…you ran avrdude either too early or too late relative to when you pressed the reset toggle on the Trinket. Wait until you see the red LED slowly pulsing at around 2Hz.” I was pressing too early (about 3 flashes) and couldn’t figure out what was wrong.